
Recently, Information Security Club members have been practicing their networking skills on Raspberry Pis, and were successfully able to give their Raspberry Pi a static IP address during the previous club meeting. This allowed club members to experience first-hand how to configure a Linux server. During this meeting, I overheard a couple of club members say that they wished they had learned Linux before. This got me thinking about what the best way to force yourself to learn Linux is. Ultimately, it’s by having a stake in the matter. What I mean by that is you’ll never want or need to learn Linux unless you have to, and the way you ensure you have to is by using Linux every day, not as a server, but as your personal workstation.
While that may sound daunting to some newcomers to the Linux space, I can attest to how fun it is to use Linux as a workstation; I have exclusively done so on all of my laptops for over six years. It only took a month from the first time I used Linux to decide to completely remove Windows from my laptop now and forever. I won’t lie and say that it’s been all roses and sunshine. I was constantly messing things up and breaking them, but without Windows as a crutch to fall back on, I had to learn to fix the things I messed up. And the more you learn, the less you’ll break things and the less you’ll want to break things.
Thankfully, the Linux desktop space has drastically improved in the technical and user-friendliness space over the last four years, and now you are able to use it comfortably for most activities, including gaming, without needing to worry about everything breaking. In fact, the new Steam Deck runs on Linux. If Valve is confident enough to use Linux for a device meant for the average consumer, you should be confident enough as well!
Choosing a Distribution (or “distro”)
The Linux space is, for the most part, broken into three families of distributions, colloquially knows as “distros”: Red Hat Enterprise Linux (RHEL)-based distros, Debian-based distros, and Arch-based distros. Each has its owns little quirks and communities, but in the end they all provide one thing in common: packages and tools on top of the Linux kernel which let you more easily use Linux for your own purpose, whether that be as a server or a workstation.
For this write-up, I will focus on using Fedora Linux as a workstation for the following reasons:
- Fedora has an easy-to-use USB installation creator.
- Fedora has a relatively quick release cycle (every 6 months).
- It’s built on top of an enterprise distro (RHEL), so it should theoretically not break often.
- Fedora makes it easy to not care about details 2 and 3, because let’s face it, what average person cares about those things? We just want to use our computer and not have to think too hard about it unless we choose to!
While I will be focusing on Fedora, there are an overwhelming myriad of other choices of Linux distros, and ultimately the choice is yours for what to use. I will give shout outs to distros that have personally served me well in the past as I learned to use Linux:
Before we start the installation, please make sure all of your personal files are backed up somewhere because they will get deleted when Linux gets installed onto your drive. It’s possible to install Windows and Linux side-by-side on the same laptop and choose which to use when you turn your laptop on, but even that risks losing all of your files, so back them up. This guide will assume that you’re completely removing Windows. If you’d like to have both, research “how to dual boot Fedora and Windows”. That is beyond the scope of this guide.
Installation Preparation
Now, unless you specifically order a laptop with Linux pre-installed, you’ll need to manually install Linux onto your device of choice. You’ll want to check some things before you start:
- Device manufacturer (Dell vs Lenovo vs HP)
- CPU (Intel vs AMD)
- GPU (Intel iGPU, AMD, Nvidia)
Linux nowadays works pretty well on most laptops using Intel and AMD, but if you’re running Nvidia you may experience difficulty. Macs are a whole different story, and they’re best avoided unless you really want to put Linux onto one. It’s best that you do research to see how well your laptop supports Linux.
For this write-up, I’ll be using a Dell Latitude E7470, a standard laptop you’ll see in business and school settings.
As I stated before, Fedora provides a tool that makes it easy to create a USB installer. Grab a spare USB drive that’s 2GB or more, and download Fedora Media Writer for your Windows or Mac machine. Install it and make sure your USB device is plugged in before you open it.
Upon opening Fedora Media Writer, you’ll want to choose “Download automatically” and hit “Next”. You’ll be greeted with this page:
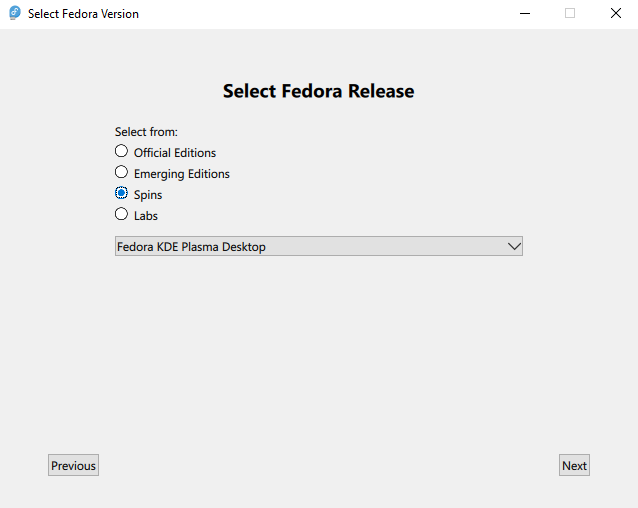
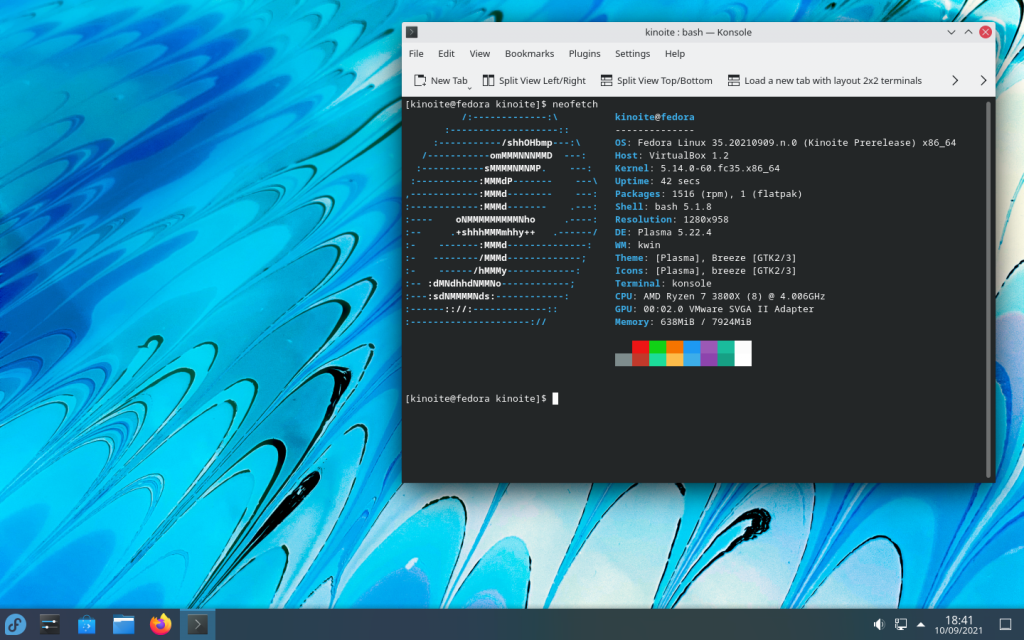
Fedora has many different options for installation, but for this purpose, I’ll be choosing Fedora KDE Plasma Desktop, which is basically just Fedora that will look similar to this when we’re done:
You can hit “Next”, select the USB drive this will be installed onto, and hit “Download & Write”. Once that’s the done, the USB will be ready to use to install Fedora onto our laptop of choice.
Installation
Turn your laptop off, plug the USB into it and boot your laptop into the boot menu. For Dell laptops, this involves pressing F12 as your laptop boots. This may vary between brands, so please research how to do so on whatever machine you have. You should see a list of options, including the USB drive you have plugged in. Navigate to it and hit “Enter” (Note: If you don’t see an entry for your USB in the boot menu or if you click it and nothing happens, you’ll need to investigate how to turn off Secure Boot on your laptop).
You’ll now boot into the USB and be able to test out Fedora before installing it. What you see now is essentially how things will look when you’re finished installing it, so feel free to get a feel for things. You’ll likely want to connect to a WiFi network at the bottom right corner.
Once you’re ready to install, click the “Install to Hard Drive” icon on your desktop.
Set your keyboard layout and time zone in the installer. The “Installation Destination” step is important! This is where you will tell Fedora to install itself onto your computer’s hard drive, deleting anything else you had on there. Select your hard drive, click “Done”, and if prompted, choose “Reclaim Space”, “Delete All”, and “Reclaim Space”. Fedora will now know to install itself onto your drive.
Skip “Root Account” as that is disabled nowadays, and go to “User Creation”. Set your username and passwords, hit “Done”, and you should be ready to “Begin Installation”. This may take a while, just sit tight until it’s done. Eventually you’ll be prompted to remove the USB and reboot. Upon reboot, you’ll be greeted with the login page to your new Fedora workstation!
Acquiring Software
Great, you’ve logged in to your new operating system! Luckily, it hasn’t left you to fend for yourself. You’ll find that Fedora comes with plenty of software that you’d need on a day-to-day basis, including but not limited to:
- Discover – a software center or “app store”
- Elisa – a music player
- Firefox – a web browser
- KCalc – a scientific calculator
- KDE Connect – an app to see your phone notifications with your phone, share clipboards, etc.
- KMahjongg – a Mahjongg game
- Konsole – a terminal
- Libreoffice – a suite of software similar to Microsoft Office
- Okular – a PDF viewer
Great, that’s enough software to let me browse the web and do some homework, but what if I’d like to get more software? Well, this is where things get a little iffy and will require a bit of history and the introduction of some new developments in the Linux desktop space.
Linux Package Management
Many of you may be familiar with the string of commands sudo apt install <software> which installs <software> onto a machine. In this case, apt is what we call a package manager, specifically the package manager used on Debian-based distros. Keep in mind that Fedora’s package manager is dnf, so the equivalent would be sudo dnf install <software>.
Essentially, there are volunteers who find a bunch of the software people tend to use on Linux, and then “package” it. They put software into a file that has information about how the software should be installed, what other programs it needs to function correctly, etc. This file is then put into a repository, which you can think of as a sort of “app store”. When you run sudo apt install <software>, apt searches the repository that your computer is configured to use, finds the software you want, and downloads it along with anything else the software needs to run. While this sounds complicated, all it really means is that running sudo apt install firefox in a terminal will install Firefox onto your computer! Pretty simple. In fact, you don’t even need to open a terminal to install anything. You can use Discover, the built-in software center, to search for Firefox and install it through there.
Historically, this is how people installed packages on Linux, but there are some problems with this model:
- Release cycles
- Most distros go through a release cycle, so outside of security updates, they only update the packages in a repository every so often.
- For Fedora, it’s every 6 months. For other distros, it could be anywhere from 1 to 2 years.
- This means that if software gets updated, it may be months before you get to see that update.
- Dependency hell
- Let’s say you want software A and software B. Software A depends on version 1.5 of software C, but software C depends on version 1.6 of software C.
- You can’t have both versions of software C installed! What now?
- People who manage repositories do their best to alleviate these kinds of issues, but sometimes it just doesn’t work out and you get a mess of downloads.
- A dirty system
- Let’s say you’ve been using your machine for years. You’ve downloaded lots of packages over the years, uninstalled just as many, and forgotten that you’ve installed even more on top of that!
- Sometimes, packages leave a bunch of files all over the place, and you’ve no idea where exactly.
- Suddenly, you have a bunch of random packages and files that have made God knows what changes to your system. If something messes up, where do you even start to try to troubleshoot?
Of course, for its many faults, this system has worked for decades and is admittedly quite elegant for things like managing important system packages, but other solutions, particularly ones geared for easy use of desktop applications, have appeared since the introduction of package managers.
AppImages
AppImages are one of the methods that attempt to simplify the use and distribution of desktop software in Linux. They work similar to a .App in MacOS or a .exe in Windows. All you need to do is download an AppImage, click on it, and now the application opens and runs! A good example of this is LMMS, a music production application, which distributes its application on Linux using AppImages. AppImages make downloading software on Linux similar to Windows, but come with the same problems: how do I discover software, and where should I put my .AppImage files? There have been attempts to mitigate these issues, such as through the AppImageHub, a repository of AppImages, and through AppImageLauncher, which will automatically organize your AppImages into the Applications folder, similar to how it’s done on MacOS with .App programs.
AppImages are rather convenient in the fact that deleting the .AppImage file means you’ve deleted the program! Pretty great! There may be some files left over in your user’s directory, but theoretically your system files should be clean.
Flatpaks
Flatpaks have been making strides in the Linux desktop space for the past couple of years. Flatpaks make it possible to do the following:
- Package applications once and ensure they run on any Linux distro that supports Flatpak.
- Package apps in a container with their dependencies, to avoid dependency hell when installing multiple applications.
- Sandbox apps, similar to on Android and iOS, so that apps that don’t need access to the network or to your files won’t have that access.
- Update apps when the developer of the app decides instead of the release schedule of your distro.
- Delete applications knowing that they don’t leave unwanted files in your system directories.
- Having the necessary media codecs needed to play common music and video files.
Flatpak is even pre-installed on Fedora and integrates with Discover so that you don’t need to download anything new to use it. Out of the gate, Flatpak on Fedora points to Fedora’s Registry, but due to legal and philosophical issues, is limited in what software it offers. You’ll likely want to use the Flathub repository, instead, which comes with many popular pieces of software, such as Steam, Discord, and Spotify (feel free to browse their website and see all of the software they offer for free!). Luckily, Fedora makes it easy to configure Discover to use the Flathub repository instead of its own registry. If you open Discover’s settings, you’ll see a button called “Add Flathub” at the top right. Press it to add the Flathub repository to Discover.
Personally, I would raise the priority of Flathub to the top, disable the “Fedora Flatpaks” repository, and set Flatpak as my default source, but the choice is yours. With that setup done, if you go to “Home” in Discover and search for software, you’ll get a list of software with Flathub software at the top and software that’s from your system’s package repository marked with “Fedora Linux 37 (KDE Plasma)” under it. Take this screenshot as an example:
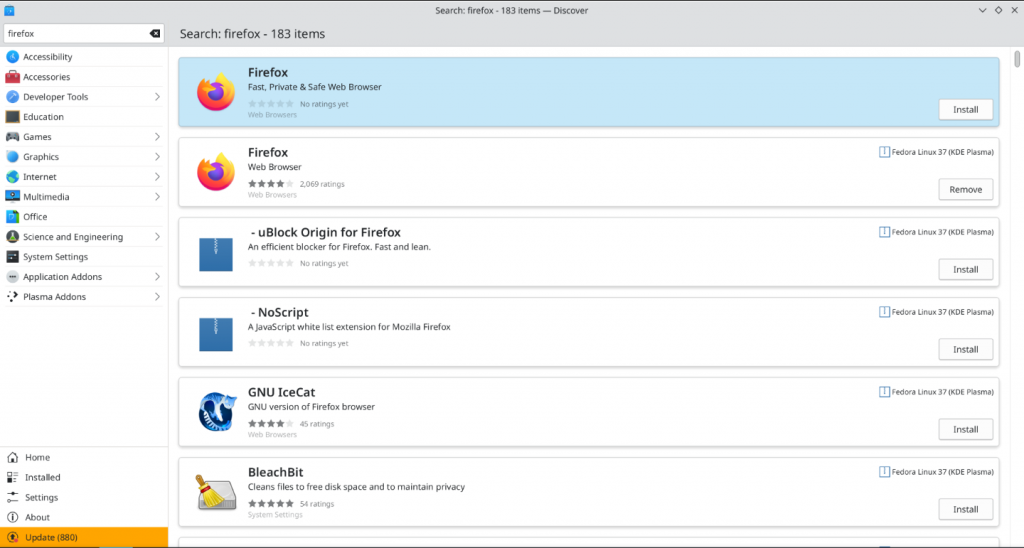
The first Firefox option is the one from Flathub, the second is the one we’ve already got installed on our system. This is a little confusing, but admittedly it’s a poor example since Firefox happened to be installed already.You won’t see this problem for other software.
Note: I’d recommend removing the system Firefox and using the one from Flathub. Fedora only provides open source media codecs through its system package manager for legal and philosophical reasons. As far as I’m aware, the Flathub Firefox includes media codecs that makes hardware acceleration for videos possible.
With this setup complete, now you can install software straight from Discover and enjoy the benefits of Flatpaks. No need to touch your terminal (unless you want to, of course!) or scour the internet for .exe files like on Windows.
Now, for all their pros, Flatpaks are still relatively new technology that have some pain points. For one, Flatpak can sandbox applications, which can be good for security but also make some things inconvenient. For example, by default the Discord Flatpak only has access to your Downloads folder, nowhere else. This can be incredibly confusing to people who downloaded Discord and didn’t know about this restraint. There are two solutions to such a problem:
- On the developer side, portals. Essentially, the idea is that users should trust the operating system over applications. So an application should request permission from the user when needed. This is what portals allows applications to do. A developer can take advantage of portals so that when a user needs a file, the application will call a portal, and the portal will open the file manager so that the user can choose the file, which the portal will then pass to the application. The application only sees the file that the portal gives it, which is the file you gave it permission to use. Safe and convenient. However, developers need to take advantage of portals, and sometimes they either refuse to or don’t have the time or funds to change their application to do so.
- On the user side, giving applications broader permissions. If an app doesn’t implement portals and you want it to always see a particular folder you can give it permission to do so. The easiest way of doing this is by downloading Flatseal, which you can get from Flathub. After downloading it and navigating to the Flatpak app you wish to change permissions for, you’ll see something like this:
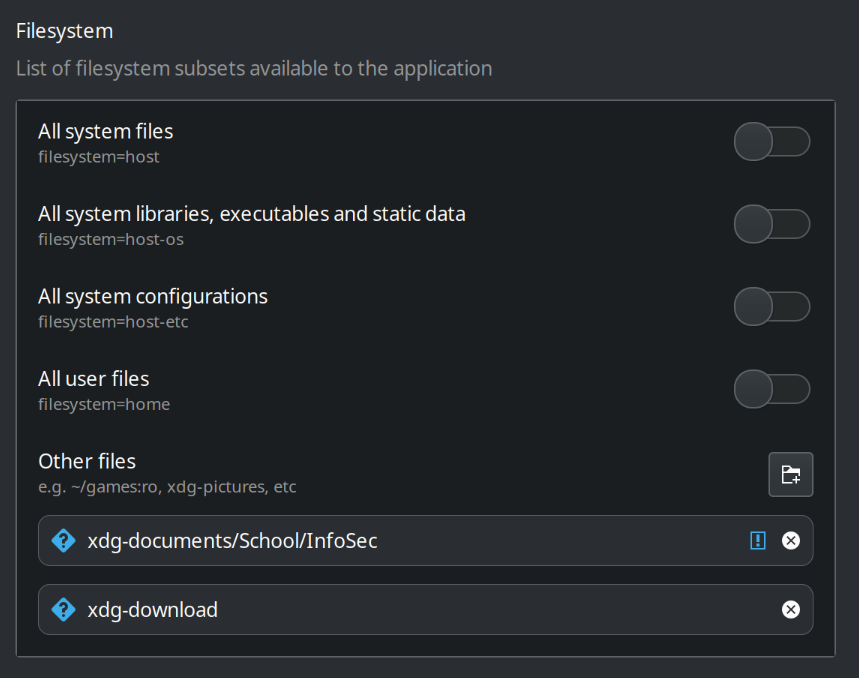
I’ve given this particular application access to my downloads folder and my Documents/School/InfoSec folder. Great! Now the application has more permissions and I can use it without hassle. You can do the reverse, too, where you take away access from the app so that it doesn’t have access to parts of your filesystem or so that it can’t use Bluetooth or network.
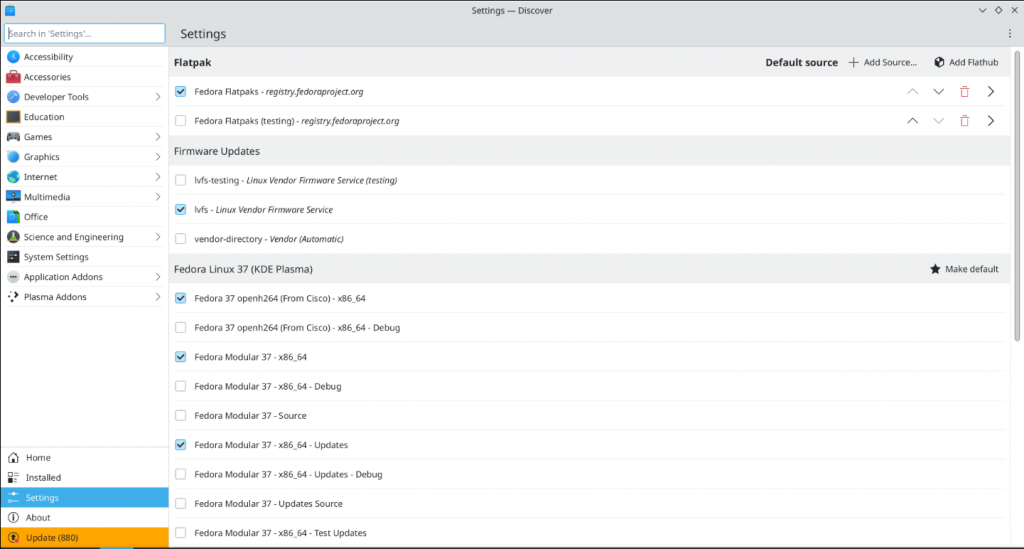
Note: Flatseal’s capabilities are now built into KDE Plasma Desktop. If you run updates on Discover after booting into your desktop for the first time and then restart, you should be able to search for “flatpak” and see this settings page:

Because of this, Flatseal is now superfluous. However, I’ve personally run into errors when using this Settings page since it is a new addition, so using Flatseal in the meantime until bugs are ironed out will not hurt.
Things should get better on this front as more applications take advantage of things like portals. The Linux desktop, while better than ever, is also in the middle of an awkward transition from an insecure model of trusting everything to a more secure permissions-based model.
Windows Applications on Linux
That’s all great, but what if there’s a Windows application I can’t find an alternative to that I really need? Personally, I’ve only had this problem with games, which is easily solved if your games are on Steam by activating Steam Proton. You should be able to search on the internet how to do that. Just make sure to search ProtonDB to see what games work best.
In case you have this problem with non-game software, your best bet is to use Bottles, a program available on Flathub that uses WINE to run Windows software. WINE translates Windows system calls that programs use into Linux system calls so that the programs run straight on Linux. Bottles makes it easy to use WINE, just make sure you check WINE’s application database to see how well your program runs on WINE.
I recommend avoiding this if you can and to find alternatives to the software you’re attempting to use. Linux is not Windows, so trying to use it like you use Windows is only setting yourself up for frustration.
Great! Now you have two ways of installing software on your new desktop: Flatpaks for desktop applications and the system package manager for system updates and terminal based programs, and you can download and update both straight from Discover!
X11 and Wayland
I mentioned already that Linux is in an awkward transition phase, and part of that involves the transition from X11 to Wayland.
X11 is a windowing system protocol that essential describes how to draw things on the screen, giving us things like GUIs and windows. X11 is network-transparent, meaning that it can be run as a server, and a remote terminal could connect to it, sort of like using a remote desktop. Also, all windows could “see” one another and “hear” the user’s keypresses. This made it easy for apps on Linux to implement screen sharing and recording, and global hotkeys.
However, besides that model being insecure, X11 is also old technology, so developers starting writing a new protocol that takes into account modern uses of machines, mainly as personal workstations, like a laptop or mobile phone. This effort became the Wayland protocol, a new way of implementing a display server that also introduced secure ways of sharing and recording your screen and implementing global hotkeys. Nowadays, Wayland is the default display server for many Linux distributions, including Fedora.
However, not every app has transitioned to Wayland, so many still need X11 to run. Wayland solves this by implementing XWayland, basically running an X server in tandem with itself, so that you can run any app without much trouble. A major downside, though, is that things like Zoom, Discord, and Teams run through XWayland, so you lose the ability to share your screen on those apps unless you log out and switch to X11 in the login screen.
Thankfully, as of just a couple days ago, a developer hired by Valve has introduced a program to work around this issue. Now, with this program running in the background, if you’re on Wayland and an XWayland app requests permission to share your screen, the program, XwaylandVideoBridge, will catch this and share your screen with the app. Hopefully, this will be added by default to Linux distros that use Wayland by default and users can use their desktop like normal.
Eventually, as all apps transition to Wayland, this tool and XWayland may not even be necessary. Personally, I wouldn’t bet on that. Linux users are an opinionated bunch and love sticking with what they know.
Exploration and the Wider Community
You’ve installed Linux and are using it as a normal workstation. This is pretty conducive to learning by experience, but one doesn’t learn alone! No, you learn by seeing what others do, reading documentation, and discussing cool new software with others which in turn motivates you to experiment yourself.
Therefore, I think that a discussion about the Linux community and the best way to navigate it is in order.
Just like most communities, you’ll find Linux communities on Discord, Reddit, etc. However, the Linux community has a strong inclination toward Free and Open Source / Libre Software (FLOSS) and the philosophies that come with that. Because of this, you’ll find many members of the community coalescing around social networks built on top of open standards and protocols. For example, some communities hang on mailing lists. Others hang on Internet Relay Chat (IRC), Extensible Messaging and Presence Protocol (XMPP), and Matrix chat servers. Still others hang on social media networks built on top of the ActivityPub (AP) standard.
What exactly these all mean is not what’s important, rather the important thing to understand is that the Linux community’s adherence to the FLOSS philosophy and the wider philosophy of hacking culture is a big part of their own culture. Understanding this philosophy and taking it on yourself if desired will help muster the excitement one needs to want to learn more about Linux in general, which will ultimately help to learn about Linux for server and enterprise usage.
One final note to dear readers: search the internet for any questions you may have, join community spaces and ask questions to learn, and never give up!